
How to Apply Eyeshadow: Tips + Tricks
Learning how to apply eyeshadow is a game-changer in any makeup routine. Whether you want to achieve a simple everyday look or a bold, dramatic effect, knowing how to do eyeshadow properly can enhance your eyes and elevate your overall appearance. With the right techniques, you can create effortless transitions, define your eye shape, and ensure your makeup lasts all day.
From choosing the right colors to blending like a pro, this guide will cover everything you need to know about how to put on eyeshadow step by step. If you’ve ever wondered how to apply an eyeshadow for the best results or struggled with how to use eyeshadow effectively, you’re in the right place. By the end of this tutorial, you’ll know exactly how to wear eyeshadow for any occasion.
Before we jump into the eye shadow how to apply process, let’s first explore why eyeshadow is such an important part of makeup and the different types of textures available to achieve various looks.
Why eyeshadow matters in makeup
Eyeshadow is one of the most transformative elements in any makeup routine. Knowing how to apply eyeshadow correctly can enhance your eye shape, create dimension, and bring balance to your overall look. Whether you prefer a soft, natural finish or a bold, dramatic statement, mastering how to do eyeshadow allows you to customize your style effortlessly.
The way you put on eyeshadow can influence how your eyes appear. Lighter shades can make the eyes look bigger and more awake, while darker shades add depth and intensity. By understanding how to apply an eyeshadow with the right colors and techniques, you can define and highlight your features to complement your face shape.
For beginners, learning how to use eyeshadow can seem overwhelming, but with the right steps and tools, the process becomes simple. Whether you’re experimenting with simple eyeshadow looks or trying more advanced techniques, the key is blending properly to achieve a seamless transition between shades. Applying eyeshadow is similar to contouring - it shapes and enhances your eyes to make them stand out.
Additionally, knowing how to wear eyeshadow for different occasions ensures versatility in your makeup routine. Soft, neutral shades are perfect for daytime, while deeper, smokier hues can create a striking effect for the evening. By following a step-by-step approach to how to apply makeup eyeshadow, you can achieve a flawless finish every time.
Ultimately, eyeshadow is more than just color—it’s a powerful tool for self-expression. Once you understand how to put on eyeshadow makeup effectively, you’ll have the confidence to experiment with different textures, colors, and styles to enhance your natural beauty.
Prepping your eyes for long-lasting eyeshadow
Achieving a flawless eyeshadow look starts long before you apply any color. Proper preparation ensures that your eyeshadow stays vibrant, crease-free, and lasts all day. If you’ve ever struggled with your eyeshadow fading, smudging, or settling into fine lines, learning how to apply eyeshadow on a well-prepped base is essential.
Cleanse and moisturize
Before you even think about how to do eyeshadow, start with a clean, hydrated base. Gently cleanse your eyelids to remove any oil, makeup residue, or dirt. Follow up with a lightweight, fast-absorbing eye cream to keep the delicate skin around your eyes smooth. This step prevents dryness and ensures that your eyeshadow applies evenly.
Apply an eyeshadow primer
One of the biggest secrets to mastering how to put on eyeshadow is using a primer. An eyeshadow primer creates a smooth, even surface, prevents creasing, and helps color grip better to the skin. If you don’t have a primer, a dab of concealer blended across the lid works as a great alternative. Just make sure to set it with a light dusting of translucent powder to avoid creasing.
Set the base with powder
For those wondering how to apply an eyeshadow without it smudging or fading, setting your primer with a neutral-toned eyeshadow or a translucent setting powder is a must. This step locks in the base, making it easier to blend shadows smoothly while preventing patchiness.
Avoid excess oils on the eyelid
Oily eyelids can break down makeup quickly, making it harder to maintain simple eyeshadow looks throughout the day. If you have naturally oily lids, blot them with a tissue before applying primer, or use an oil-free primer for better longevity.
Choose long-wear or waterproof formulas
If you want to know how to use eyeshadow for an all-day wear, opt for long-lasting or waterproof formulas. Cream and liquid eyeshadows can be great bases for powder shadows, helping the colors stay intense and crease-free for longer.
By following these essential prepping steps, you’ll create the perfect base for your eyeshadow, ensuring it lasts all day without smudging or fading. Now that you know how to apply eyeshadow on a well-prepped lid, it's time to dive into the details of applying eyeshadow like a pro.
Let’s explore the step-by-step process of how to do eyeshadow, from choosing the right shades to blending techniques that will help you achieve flawless eye makeup looks.
Find the right tools
If you want to master how to apply eyeshadow, having the right tools is just as important as choosing the right colors. While using your fingers might work in a pinch, investing in high-quality brushes will give you better control, precision, and blending power. Whether you're learning how to do eyeshadow for the first time or refining your skills, the right brushes can make a noticeable difference in your application. Check out our guide on the best makeup brushes for eyeshadow to find the perfect tools for seamless application.
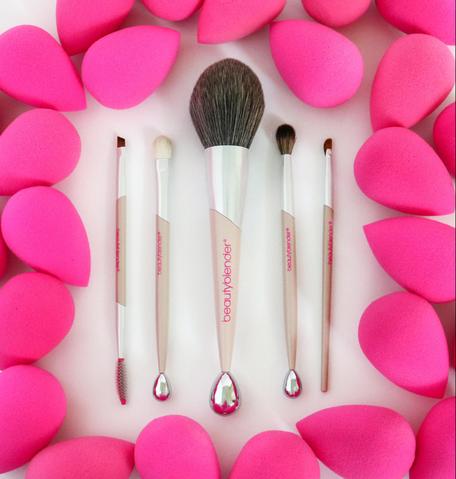
Essential eyeshadow brushes for flawless application
To ensure seamless blending and perfect placement, here are the must-have brushes for how to put on eyeshadow like a pro:
✔ Basic eyeshadow brush – Ideal for packing color onto the lid and intensifying pigment.
✔ Blending brush – A fluffy brush that softens harsh lines and creates smooth transitions between shades.
✔ Crease brush – Designed to apply darker shades precisely in the crease for added depth and dimension.
✔ Angled brush – Perfect for applying shadow along the lash line, defining the outer corner, or even softening eyeliner.
Having these tools in your makeup kit will make applying eyeshadow much easier, whether you’re creating simple eyeshadow looks or experimenting with bold styles.
Why high-quality brushes matter
Good brushes ensure even color distribution and effortless blending, which is key for achieving a polished finish. Synthetic, cruelty-free brushes are a great option as they are soft, durable, and work well with both powder and cream eyeshadows.
For those looking to enhance their eyeshadow application, our Detailers Brush Collection is designed to give precision and seamless blending. Some of these brushes even feature rollerball tips for a cooling effect, making.

Pick your palette
Choosing the right colors is key to mastering how to apply eyeshadow. Whether you prefer a smoky eye with deep blacks and browns or a natural look with soft beiges and pinks, selecting a balanced palette ensures a flawless finish.
To create dimension, always use these three essential shades:
✔ Light shade – Highlights the brow bone and inner corners.
✔ Mid-tone shade – Applied on the lid as a base.
✔ Darker shade – Adds depth in the crease or outer corners.
Knowing how to do eyeshadow also means understanding placement:
✔ Lid – Main area for the mid-tone shade.
✔ Crease – Where deeper shades create depth.
✔ Brow bone – Highlighted to lift the eyes.
Now that your colors are set, the next step is prepping your lids with primer to lock in your eyeshadow makeup for long-lasting wear.

Prime your lid
If you want to know how to apply eyeshadow like a pro, never skip the primer. A good eyeshadow primer creates a smooth, even base, helps colors pop, and prevents creasing or fading throughout the day.
You can use a dedicated eyeshadow primer or apply a thin layer of concealer to neutralize discoloration and veins on your lids. Set the primer with a light dusting of translucent powder to keep your eyeshadow makeup in place.
The key is to apply just enough - too much primer can cause patchiness, while too little may not hold the shadow well. With a bit of trial and error, you’ll find the perfect amount for long-lasting, crease-free eyeshadow looks.
Apply your base eyeshadow on the lid
The first step in how to apply eyeshadow is creating a smooth, even base. Your base shade should be a mid-tone color—one that is closest to your natural skin tone - to help blend other shades seamlessly.
Using a flat eyeshadow brush, apply this shade across your entire lid, extending just slightly into the crease. This step helps build a foundation for the rest of your eyeshadow makeup, ensuring smooth transitions between colors.
To keep your eyeshadow application clean, imagine two invisible boundary lines: one from the outer corner of your eye to the end of your brow and another from your inner corner to the bridge of your nose. Keeping your shadow within these lines helps create a polished look.
Now that your base is set, the next step is adding depth and dimension by applying a transition shade in the crease.

Apply your transition shade in the crease
Adding a transition shade is key to creating depth and blending colors seamlessly. This step defines the eyes and makes the overall eyeshadow application look polished and natural.
Choose a darker contour shade - one slightly deeper than your base color. Using a crease brush, apply it along the crease of your eyelid in windshield-wiper motions, gradually building intensity.
Blending is crucial here. Start with a light hand and blend until the color diffuses smoothly into your base shade. If you have hooded eyes, keep your eyes open while applying to ensure the shadow is visible.
Now that the crease is defined, it's time to brighten the eyes by applying a lighter shade to the brow bone and inner corners.
Use a lighter shade below your brow and in the inner corners
Highlighting key areas of the eye enhances dimension and gives a bright, lifted effect. To perfect your eyeshadow application, apply a light shade just below your brow bone and in the inner corners of your eyes.
Using a small brush or your fingertip, gently pat a matte or shimmery light shade onto the brow bone to create a lifted look. For an instant brightening effect, tap the same shade into the inner corners of your eyes. This trick helps make the eyes appear more awake and adds a touch of radiance to any eyeshadow look.
With these highlights in place, it’s time for the final steps - blending everything seamlessly and defining the lash line for a complete, polished eye makeup look.
Blend it all and rim your lashes
The secret to flawless eyeshadow application is blending. Harsh lines can make even the best eyeshadow looks appear unpolished, so take a clean blending brush and gently diffuse any harsh edges between your shades. Soft, circular motions will help create a seamless transition between colors.
Once your eyeshadow is perfectly blended, define your eyes by rimming your lashes. Use a darker eyeshadow shade with a tapered or angled brush to lightly line your upper and lower lash lines. This technique gives a soft, smoky effect and is a great alternative to eyeliner for a more natural finish.
For added depth, you can smudge the color slightly for a lived-in, blended effect. Now, just add mascara, and your eyeshadow makeup is complete - perfectly blended, defined, and ready to last all day.
Mastering how to apply eyeshadow doesn’t have to be complicated. With the right tools, proper preparation, and a step-by-step approach, you can create everything from simple eyeshadow looks to more dramatic, statement styles. Whether you're just learning how to do eyeshadow or refining your skills, practice, and blending are key to achieving a flawless finish.
By choosing the right shades, understanding eyeshadow application techniques, and knowing how to put on eyeshadow for your eye shape, you can enhance your natural beauty and make your eyes stand out. Remember, great eyeshadow makeup starts with a well-prepped lid, smooth blending, and a touch of definition along the lash line.
Now that you know how to wear eyeshadow like a pro, it’s time to experiment with different colors, finishes, and techniques. Keep practicing, find what works best for you, and have fun creating endless eyeshadow looks that suit any occasion.


